Pre-requisites
Before we deploy any resources using terraform and DevOps we need to know complete few items.
- Store Terraform state file
- Create Azure DevOps Project
- Create Azure Service Principal
- Sample Terraform code
Finally, creating yaml file to deploy the code.
Store Terraform state file
When deploying using Terraform it will create a state file locally where the terraform is run. The state file is used by Terraform to map Azure Resources to your configuration that you want to deploy, keeps track of meta data and assist further when scaling.
So, it is recommended to store the state file in a repository and use it whenever you work with the Infrastructure thus improving security. Here we will not target security but storing terraform state file remotely. In this deployment, we will the state file remotely in an Azure storage account.
Lets deploy the required storage container called tfstatedevops in Storage Account tempsa inside Resource Group temprg
Commands
New-AzureRmResourceGroup -Name "temprg" -Location "eastus2"
New-AzureRmStorageAccount -ResourceGroupName "temprg" -AccountName "tempsa" -Location eastus2 -SkuName Standard_LRS
New-AzureRmStorageContainer -ResourceGroupName "temprg" -AccountName "tempsa" -ContainerName "tfstatedevops"
Now we have created the repo to save our state file.
Create Azure DevOps Project
You need a project inside your Azure DevOps(ADO) organization to deploy using terraform.
This one is straight forward. Create a project in name ‘temproTerraform ‘
Create Azure Service Principal
A Service Principal (SPN) is considered a best practice for DevOps within your CI/CD pipeline. It is used as an identity to authenticate you within your Azure Subscription to allow you to deploy the relevant Terraform code.
We will create a SPN from ADO.
First, in the newly create Azure DevOps Project – select Project Settings
Select Service Connections
Select Create Service Connection -> Azure Resource Manager -> Service Principal (Automatic)
You can keep the scope level of this SPN to Subscription or RG which we created earlier.
You can select Manage Service Principal to review further and make any changes, If required.
For the sake of simplicity I renamed the SPN name to ‘tempdeploySPN’
Also, gave the SPN contributor access to subscription.
Go to subscription – > IAM -> Role assignments- Select contributor -> select SPN
Sample Terraform code
We’re now near ready to configure terraform using ADO. In my example I will deploy a Storage Account tempsa2 inside a Resource Group temprg2 .
provider "azurerm" {
    version = "~>2.0"
    features {}
}
terraform {
  backend "azurerm" {}
}
data "azurerm_client_config" "current" {}
resource "azurerm_resource_group" "temprg" {
  name     = "temprg2"
  location = "eastus2"
}
resource "azurerm_storage_account" "tempsa" {
  name                     = "tempsa2fj122"
  resource_group_name      = azurerm_resource_group.temprg.name
  location                 = azurerm_resource_group.temprg.location
  account_tier             = "Standard"
  account_replication_type = "LRS"
}
Now let’s setup Azure DevOps to deploy your Terraform into Azure.
Install the Terraform extension/task from here
The Terraform task enables running Terraform commands as part of Azure Build and Release Pipelines providing support for the following Terraform commands
- init
- validate
- plan
- apply
- destroy
Once installed, we can now configure a pipeline
Select your Repo -> Setup Build
Select Starter Pipeline
Now you are Produced with an .yml format. Further understand documented here
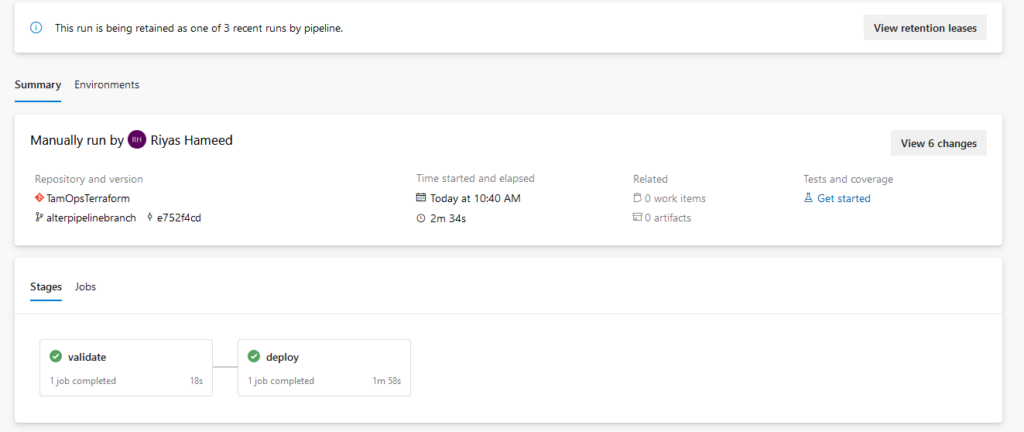
In my Pipeline, I have two Stages
Validate:- To Validate my Terraform code, if validation fails the pipeline fails (consists of Terraform init & validate)
Deploy:- if Validation is successful, it moves to next stage of pipeline which is Deploying the Terraform code to deploy required Azure Resources (consists of Terraform plan & deploy)
Throughout the Pipeline, there is reference to the storage account and SPN which we created earlier.
	backendServiceArm: 'tempdeploySPN'
	backendAzureRmResourceGroupName: 'temprg'
	backendAzureRmStorageAccountName: 'tempsa'
	backendAzureRmContainerName: 'tfstatedevops'
	backendAzureRmKey: 'terraform.tfstate'
Full Azure DevOps Pipeline
stages :
  - stage: validate
    jobs:
    - job: validate
      continueOnError: false
      steps:
      - task: TerraformInstaller@0
        displayName: 'install'
        inputs:
          terraformVersion: 'latest'
      - task: TerraformTaskV2@2
        displayName: 'init'
        inputs:
          provider: 'azurerm'
          command: 'init'
          backendServiceArm: 'tempdeploySPN'
          backendAzureRmResourceGroupName: 'temprg'
          backendAzureRmStorageAccountName: 'tempsa'
          backendAzureRmContainerName: 'tfstatedevops'
          backendAzureRmKey: 'terraform.tfstate'
      - task: TerraformTaskV2@2
        displayName: 'validate'
        inputs:
          provider: 'azurerm'
          command: 'validate'
  - stage: deploy
    jobs:
    - deployment: deploy_terraform
      continueOnError: false
      environment: 'dev'
      strategy:
       runOnce:
         deploy:
            steps:
              - checkout: self
              - task: TerraformInstaller@0
                displayName: 'install'
                inputs:
                  terraformVersion: 'latest'
              - task: TerraformTaskV2@2
                displayName: 'init'
                inputs:
                  provider: 'azurerm'
                  command: 'init'
                  backendServiceArm: 'tempdeploySPN'
                  backendAzureRmResourceGroupName: 'temprg'
                  backendAzureRmStorageAccountName: 'tempsa'
                  backendAzureRmContainerName: 'tfstatedevops'
                  backendAzureRmKey: 'terraform.tfstate'
              - task: TerraformTaskV2@2
                displayName: 'plan'
                inputs:
                  provider: 'azurerm'
                  command: 'plan'
                  environmentServiceNameAzureRM: 'tempdeploySPN'
              - task: TerraformTaskV2@2
                displayName: 'apply'
                inputs:
                  provider: 'azurerm'
                  command: 'apply'
                  environmentServiceNameAzureRM: 'tempdeploySPN'
Once you configure & save the above pipeline, you will see it beginning to run and can review both stages
After a few minutes, the build Pipeline will run through and if both stages are successful you will see similar to below
The pipeline we created and tested was a simple execution, you can configure this further depending on your requirements.